Once upon a sketch saying goodbye

I was so sad to learn earlier this month that one of the best challenge sites was finishing up - Once Upon a Sketch.  I can fully respect and understand Nadia's decision though and I'm sure wonderful inspiration will continue to be around on the net.

I want to take a minute to thank Nadia for a wonderful and inspiring challenge site.  I have often loved to play along but due to other commitments just haven't had the time.  There are so many talented scrapbookers that have designed for the site, been a guest or taken part.  There has always been so much on offer to get the mojo flowing, not to mention the wonderful sponsors that make these sites a little extra fun to play along.

I haven't had much time again this month to play along but today after spending time at the beach with my boys, coming back and playing with them I sat down for a little me time and scrapbooked one of the photos from the day.  I was really inspired by the challenge, and it was so fitting with the prompt being 'December' as this is the time we get to go away as a family and have a REAL holiday.  I cherish this time taking the kids to new places, exploring, making wonderful memories and also having some much needed relax time, and this picture is just one example of the fun we have.

Here is my layout:

I stayed quite true to the sketch but as I didn't have any flowers with me in the caravan I used embellishments and twine to help me keep the design elements happening along with the sketch.  My other challenge was realising I didn't have any texture paste and I really wanted to add some texture into my background, so instead I used carpet tape and coated it with a layer of gesso after removing the plastic backing and adhering it to the background.  The crafter's workshop stencil TCW496 was just perfect to finish off my page and the other design elements of the sketch.

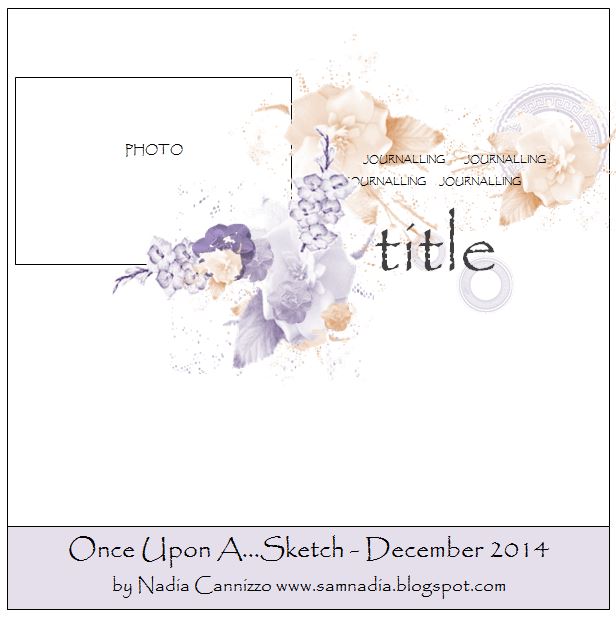
Here is the challenge sketch:

Some detail pictures so you can get up and close to the page.


I used lots of different products on this page:

  • The Crafter's Workshop stencil - Sea Creatures
  • Bazzill Card Shoppe collection - Marshmallow cardstock
  • Faber-Castell Design Memory Craft Gelatos in mint and butterscotch
  • Kaisercraft 'Sandy Toes' collectables
  • carpet tape
  • My mind's Eye enamel dots
  • natural twine
  • Craft Queen wood embellishments
  • Scrapmatts chipboard word
  • Coloured hessian
  • gesso
Hope you enjoyed my share today of my scrappy antics in the caravan on our holidays

Happy Crafting and thanks for stopping by.  

xxxBeck

Merry Christmas!!
I hope you had a lovely day celebrating this special day wherever you were.

I am so excited to be sharing another project for Ruby Rock-it.

I love the Country Cookin' collection and today with a Thanksgiving theme I wanted to share with you a project I created to keep something I am very thankful for close to my heart.  Although my husband's mum is no longer with us I am thankful everyday for the recipes from my husband's childhood she shared with me in the years before her passing as well as the hand written recipes we have to cherish in our home.  It is so nice to have a lovely place to hang some of these keeping her close to our heart through the beautiful memories.


Ruby Rock-it Supplies used:
Country Cookin' CIN83 Die Cuts
Country Cookin' CIN90 3D Stickers

Other Supplies Used:
Cosmo Cricket Project hanger

It really came together rather quickly and here are some detail pictures so that you can get up and close to the project.


I'm sure this oven mitten was MADE for my project!  


I hope you enjoyed my share today and I have inspired you with my project

Happy Crafting!


It's Christmas Day here and as part of Ruby Rock-it's countdown to Christmas (my post going live on Christmas Eve over in the US) I created this elegant Christmas card without actually using Christmas themed paper.

Products Used:
Bella 'Year in Review' collection papers
CIN176 - Country Cookin Tag pack
Bella bling and lace border

Preferred Partner Products used:
Spellbinders Layered Poinsettia S5-055

Here are some more pics so you can get up nice and close


I hope you enjoyed my share today and I might have helped you out in creating a quick last minute card!


Hi Everyone I am so excited to share with you my first project on the Chameleon Blog!  I have had lots of fun with the Color Tones Pens already and I'll even share a link to my first project created with them recently on my own blog at the bottom of this post.

For this card I decided to colour this sweet image.   I teamed up the coloured image with divine Spellbinders - Opulent Ovals die set and beautiful pattern papers finished off with bright and cheery Manor House flowers.

 Here is a nice detail shot for you as well

I am by far no colouring expert, but enjoyed how quick and easy the pens made colouring this image.

I recently made another card which I shared on my blog.  If you missed it, head on over here to check it out.  I even have a video showing how it came together if you are curious to see these new pens in action!


I hope you enjoyed my share today and that you get to have a little fun playing with this awesome pens.

xxxBeck BT


Creative Cards with Ruby Rock-it


Hi it's Beck BT here today and I am so excited to be sharing with you some delightful feminine cards created using the Heritage collection.

I adore how easy this collection is to work with especially when it comes to making cards!

Here are 3 cards I created each showing how enhancing the papers with some of the dimensional stickers can really make those cards stand out.


Products Used:
Heritage Collection Pattern Papers

Preferred Partner Products used:
Spellbinders Back to Basic Tags die set S4-367

I hope you enjoyed my share today and I inspired to to go out and create some fun cards!


A Snowy wedding

Hi Everyone it has been pretty crazy here as always at this time of year for me, but I have taken a little time out to play along with some friends using the new A Gilded Life Beacon St. Chapel die set.
This set is so darn cute!  I have so many ideas for it, but I thought my first go would be to create an accompanying piece to my Snowman display - I collect them and have SO many.  It doesn't snow here, so while I dream of one day experiencing my 'White Christmas' I have them out instead!

The theme for mine is 'A Snowy Wedding' for these two love birds!


I used some Kaisercraft paper from their 'Just Believe' collection, white glitter cardstock and to finish it off I added the perfect embellishment one of the Gilded Life Relics A pieces - the cross.


Some of my fellow designers on the Spellbinders team have played along too, so if you would like to see some other decorating ideas for this cute item check them out!  Each is different and oh so divine!


Hope you enjoyed my little share today getting into the Christmas Spirit!


New kit release for Scrappy Chat designs

We have a new kit release over at Scrappy Chat Designs!!

This month's kit is called 'Rustic Goodness' simply because that is what it is!  A beautiful selection of Rustic style products sure to inspire you!  This month we have Kim Ewins back again to share her take on this kit and explore the products in the kit.

Head on over to the website www.scrappychatdesigns.com.au  to purchase this and other kits amongst other fun products!  CLICK HERE to order this kit


This kit features some 'new product' less consumable product that you can find a bit more about and have a play with! Aside from the divine papers by Ruby Rock-it in the kit, there is Cardstock, loads of fun embellishments as well as one of the brand you DecoArt Media line products - crackle paste, there is a texture stamp, The Crafters Workshop stencil, and a sheet of alphas as well!  As you can see as always this kit is jam packed with product for you to learn and get creative with and Kim along with the very talented Arty Chic's will show you how!   

Spellbinders die set and embossing folder have been used in the creation of the layouts with this kit, and whilst not included in the kit, are very easily adapted patterns for those that do not own a die cutting machine.  Dies can be purchased with your kit, so advise if you are interested in these when ordering.  Die used in this kit is the Enhancing banner set and also an embossing folder -  Fabric Weave:


Kim will take you through using the product along with some staple items in your stash to make 3 stunning layouts.  So get your willingness to learn as you create three different layouts with the help of THREE videos.  You are sure to nail all the techniques for each layout that don't have a view by date - you get to watch them forever if you wish!   

Kits are still $39 + Postage with LOADS of value for you money, as it is like doing 3 classes - all in the comfort of your own home!


Here is some more information for those wanting a to know little more information about our kits.


They are self-paced class kits to complete in the comfort of your own home or with a group of friends

Each month there will be LOADS of added inspiration with one of the designers creating 3 layouts of their own style with the kit, and to not leave it there the other two ladies will be sharing some added techniques using the product in the kit, so you can learn more and more!

Each premier kit comes with:
  • Video AND  instructions to complete the three layouts
  • Feature a many techniques with product to be used well after the life of the kit.  (With all of our kits you will have plenty of product and knowledge to add to future projects)
  • Photos of each project including close up detail pictures
  • All the product needed to complete the project with a list of additional basic items used such as ink/ paints/gesso/texture paste and colour sprays you will need out of your supplies.
The kits focus on how to use various products teamed up with some pretty paper to compliment them, so there is always less or non-consumable products in our kits, to not only help you complete some beautiful projects, learn many techniques and ways of using the different product as well as taking them well beyond the kit projects.

Kits are $39 + postage and come out monthly

 CLICK HERE to order this kit 

For more kits and other products visit our website www.scrappychatdesigns.com.au 

Scrappy Chat Designs Kit club Membership (e-mail us to purchase):

This lasts for 3 months is $135 and includes 3 kits at 5% off and postage for all 3 kits (they are released monthly).  As a member you also get ‘insider’ info on what is coming up in the next kit – sometimes even a pic! You get additional 'Technique sheets' showing you more techniques you can nail with the product in the kit from the talented Arty Chic's.  You are also guaranteed the kits which do sometimes sell out VERY quickly.  If you are interested in membership, you need to pay the membership fee by the 30th of the month prior.  So to commence in December (next kit to be released) you need to have your membership fee paid by 30th November - Just email for this deal orders.scrappychatdesigns@gmail.com 

Current Kit stocks:

Check out our website for up to date information in kits available.  You can search for kits only by heading to the 'Products' page and selecting 'kits' from the search bar on the left. 


Out and about - oh so much fun!

I have been getting out and about lots lately and just before you think that’s it I have some new dates and locations to share!  It is a bit of a list so you might want to grab a cuppa!  I'll also have a share below of some fun I've been having with one of my design teams!

Werribee VIC Saturday 8th November

In just under 2 weeks I will be doing a local day of classes on Saturday November 8th.  I really didn’t want my local ladies to miss out on all the fun I have been having around the traps.   As it is local they get an extra special deal too – one can’t complain about that! 

We will be doing 3 classes over the day and the choice is yours as to how many you book into – how neat is that!  BUT and yes… wait for it… if you book into all 3 not only do you get a discount, but you will also go into a draw to win an amazing set of all the share dies we will have been using over the day!  That is over $200 worth!! 

Spots are filling quick, so if you are interested please e-mail me to secure your spot!   Classes are $35 per class or $100 for the full day! 

Here are some pics and information for the classes:

 Pheonix Arizona USA

Yes this time I’m not teaching, but will be learning lots!!  I am SO excited to be heading off to America with Spellbinders for their annual Design team retreat.  I pinch myself every day that this is happening and can’t wait to head over there again, learn lots, experience new things, squeeze in some sightseeing (hoping), get to know and bond with my team mates, and come back all inspired.  Must start getting packing seeing it is only 2 weeks away now! 

Sale VIC Saturday 22nd November

When I get back from the US, the busy doesn’t stop.  Scrappy Chat Designs along with Sassy Scrappers are bringing me to Moe to teach another full day of classes!   The ladies attending will be spoilt with the opportunity to get their hands on some yummy products from the Sassy Scrappers shop while being inspired, learning new techniques and having fun with me in the classes.  Again we will be doing a WONDERFUL giveaway thanks to Spellbinders wonderful support for these events.  All you have to do is attend all 3 classes on the day to go into the draw to win a wonderful bundle of Spellbinders dies!    

Cost for this event is $40 per class

Sunbury VIC Thursday 27th November 7pm

On a Thursday I will head to Bella Carta in Sunbury to teach a scrapbook page class (details will be coming shortly).  We will be having fun with some different techniques as always.  I really enjoyed being down there for their Opening Day and being invited back to teach a class.  So I hope all my local followers are excited for this treat, especially those out that way.    Class cost $35

Keysborough  VIC Sunday 30th November

For those that love making cards I have another class happening, this time at Little Bits in Melbourne’s east.  I am SO excited to be teaching for the wonderful community of ladies that frequent this store.  We will be making 3 possibly 4 cards (details will be coming shortly) on Sunday November 30 – please call the store if you would like to book in.  Class cost is $35
I will also be doing a demonstration of Beck BT’s Tinby Designs Metallic Melts after the class, so be sure to pop in for that if not for the class as well. 

Ok….. now I can take a breath!  I sure have been busy getting out and about and I am looking forward to exciting new dates that are already been planned for next year!  I will be having a bit of a break from the teaching side over December and January for what is always special family time in my house.  So if you are not wanting to wait until next year to come to one of my classes, have a look as the dates above and contact to book in. 

If you are unsure of any contact details or simply want more information, just email me at orders.scrappychatdesigns@gmail.com and I will put you in touch if it isn’t myself taking the bookings J 

Now before I go… I want to share my take on this month’s D-Lish Scraps inspiration board.  I truly loved this board once again.  I love how it pushed me a little out of the square colour wise as well as with the fun products from the D-lish store.

And here is the inspiration board!  You still have time to play along so head here for all the details

how cute are these little bows you can get from D-Lish!  I adore that wire too!

 so many cute little flowers, perfect to accent my page.  The texture paste stencilling with The Crafter's Workshop stencil is such a beautiful detail


I hope to see you along somewhere where I'm teaching over the next month and in the mean time hope you enjoyed my take on the latest D-lish inspiration board.

Thanks for stopping by
& Happy Crafting!
xxxBeck


Hi it's Beck BT here today and I am so excited to be sharing another project for Ruby Rock-it.  I had so much fun creating this off the page project.

I really needed a clipboard for my classes and I thought, a beautifully decorated one would be JUST perfect!  Obviously I couldn't put too much on it as it would be handled and also needs to be flat to write on, but the Heritage collection papers were perfect for this adding interest without lots of bulk.


This is the clipboard I started out with - pretty plain and boring but at just over $3 I wasn't complaining as I got to turn it into something beautiful.


The wood decorative element really finished of this piece with the wood veneer, ribbon and bling trim and droplets, not to mention the stunning flowers!  I love that the collection had the perfect matching twine too to hold my pen to ensure it doesn't get lost

Ruby Rock-it Supplies used:
'Heritage' paper collection
'Country Cookin' twine pack
'Heritage' wood veneer
'Heritage' paper – Pretty Floral & Passing Time
Bella Floral – black lace and bling border
Bella Floral black and grey flowers

'Country Cookin' Droplets


I hope you enjoyed my share today and I have inspired you to create something a little different today to brighten up your world

Happy Crafting!

xxxBeck


Fun with Chameleon Color Tones pens

Recently I was asked by Chameleon to create some projects for them using their very exciting new pens.  For someone like me who is no image 'colouring' expert, I found blending a breeze with them!
As usual I've taken them a little 'out of the box' and used them on a card in a different way than colouring up an image.

Here is the card I made:


I love how the soft blending really accents this card!  
I created a video so that you can see the pens in action for yourself.  

Products used:
Chameleon Color Tone Pens used:
RD4 - Crimson Red
OR4 - Seville Orange
YL2 - Summer Sun

Spellbinders Dies used:

Paper Smooches sentiments stamp set
Bazzill Cardstock
Twine

Here is a detail pic so you can get up a little closer to my project today 


Check out more info on the pens on the website here

Also there is lots of inspiration up on the blog already here

Hope you enjoyed my share today and I've inspired you to create today

Thanks for stopping by and Happy Crafting!


Stencil fun with The Crafters Workshop temlates

As promised, here I am back again with ANOTHER share!  This time for The Crafter's Workshop.  I really had so much fun creating this layout.


I created this project with lots of different elements and even took video of me creating it so that I could share a process video to you.

Head on over to The Crafter's Workshop blog for a link to the video.

Be sure to subscribe to the channel so that you can ensure you don't miss it when I add new videos.

Hope you are having a super crafty day or busy creating treasured memories.

Happy Crafting!
xxxBeck BT